


Imagine the excitement of crafting your own cryptocurrency token, a digital asset poised to revolutionize online transactions. This guide is your comprehensive pathway into the world of cryptocurrency development, with a focus on leveraging the ERC-20 standard on Ethereum or the BSC network. It navigates you through the entire process, from concept to deployment, demystifying each step in creating a token on these popular platforms. We provide in-depth insights and practical tools, making this complex journey accessible and manageable for both novices and experienced enthusiasts in the dynamic field of blockchain technology.
Understanding the basics
Before diving into the technicalities, it's important to understand what a token is. In the context of blockchains like Ethereum and BSC, a token is a type of cryptocurrency that operates on top of another blockchain. Tokens can represent various assets or utilities.
Choose your blockchain
In our example below, we'll focus on using Ethereum's Sepolia Testnet, though the steps are quite similar to those on the Binance Smart Chain. Each platform has unique benefits: Ethereum boasts widespread use and recognition, while BSC is known for its lower transaction fees.
Setting up a wallet
You'll need a digital wallet that supports the chosen blockchain. Ethereum and BSC are both supported by MetaMask, which is a popular choice. Ensure your wallet is configured for the testnet. Information on how to configure your MetaMask wallet can be found in the linked article.
Acquiring testnet tokens
Since you're operating in a testnet, you'll need testnet tokens (not real cryptocurrency) to pay for transaction fees. These can be obtained from testnet faucets – websites that distribute free testnet tokens.
Ethereum Sepolia (SepoliaETH)
Binance Smart Chain (TBNB)
Writing the smart contract
Smart contracts are self-executing contracts with the terms of the agreement directly written into code.
These standards ensure compatibility with the ecosystem, including wallets and exchanges.
To really delve deep into the topic, you should consider the following points:
- Learn Solidity: If you're not familiar with Solidity (the programming language used for Ethereum and BSC smart contracts), you'll need to start by learning the basics. There are many free resources and tutorials available online.
- Setting Up Your Development Environment: Use an Integrated Development Environment (IDE) like Remix, which is web-based and user-friendly for beginners. Remix allows you to write, compile, and test smart contracts.
- Writing the Contract: Start with a template for ERC-20 or BEP-20. Customize the template to define specific attributes of your token, like its name, symbol, total supply, and decimal places. Ensure that you understand functions like transfer, approve, transferFrom, and events like Transfer and Approval.
- Adding Custom Features: If you want your token to have unique features (like a burn mechanism, or limited minting), this is the stage to implement them. Be cautious, as changes can introduce vulnerabilities.
To keep the first attempt as simple as possible, we will use Remix as a Development Environment (IDE) and an ERC-20 standard template for the token deployment example.
Testing the smart contract
Testing is crucial to ensure your contract works as intended and is free from vulnerabilities.
- Unit Testing: Write unit tests for each function in your contract. Test both expected behavior and edge cases. For instance, what happens if someone tries to transfer more tokens than they own?
- Test Networks: Deploy your contract to a testnet. Sepolia for Ethereum and BSC's testnet are good choices. These networks simulate the mainnet, allowing you to interact with your contract in a real-world setting.
- Interacting with the Contract: Use the Remix IDE or similar tools to deploy and interact with your contract. Ensure that functions like token transfers and approvals work as expected.
- Security Audits: Consider having your contract reviewed by someone experienced in smart contract security, especially if you plan to eventually deploy to the mainnet.
Deploying the token
After testing, deploy the smart contract. This step requires a transaction on the related blockchain which is combined with some fees.
Verification and interaction with your token
Once deployed, verify your contract on blockchain explorers like Etherscan / Sepolia Etherscan for Ethereum or BscScan / Testnet BscScan for BSC. This makes your contract more transparent and trustworthy. You can then interact with your token using your wallet or blockchain explorers.
ERC20 Sepolia Testnet Example
Provided you have set up your Metamask wallet and stocked up on testnet tokens via the described faucets, you are ready to go.
Step 1 - Create
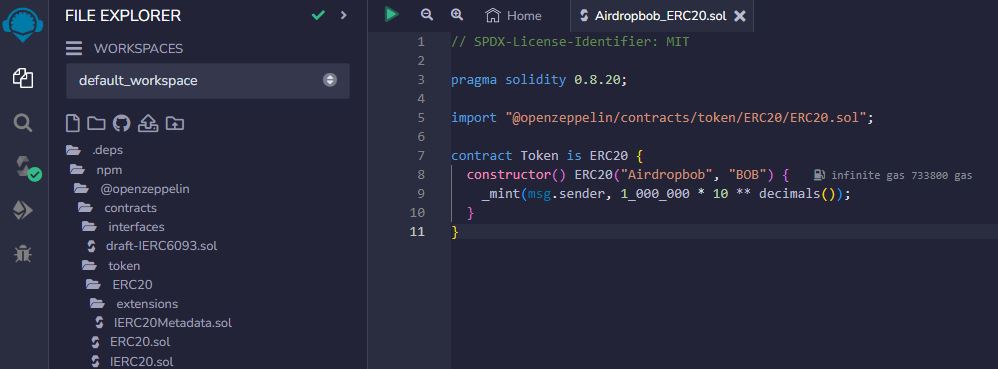
Visit Remix IDE, create a new .sol file, and add your contract code.
For this example, we'll use a standard ERC20 template:
// SPDX-License-Identifier: MIT
pragma solidity 0.8.20;
import "@openzeppelin/contracts/token/ERC20/ERC20.sol";
contract Token is ERC20 { constructor() ERC20("YourProjectName", "YOURTOKENNAME") { _mint(msg.sender, 1_000_000 * 10 ** decimals()); }}
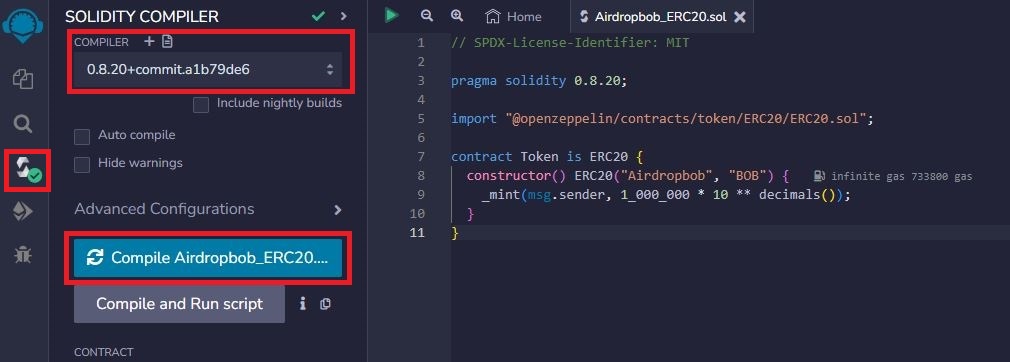
Step 2 - Compile
Save your code, switch to the compilation page, and compile your code. Make sure to choose the same compiler version in Remix.
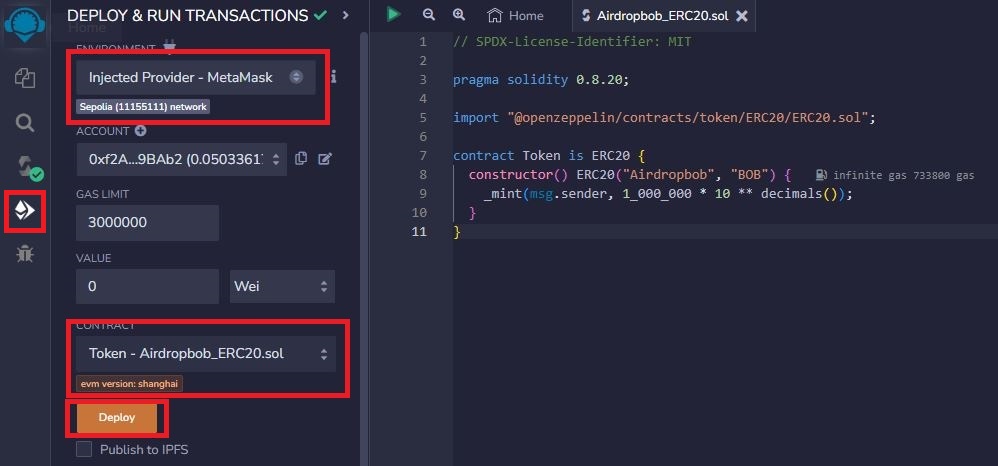
Step 3 - Deploy
Make sure your Metamask wallet is using the correct network and deploy your token.
Confirm the contract creation request via Metamask.
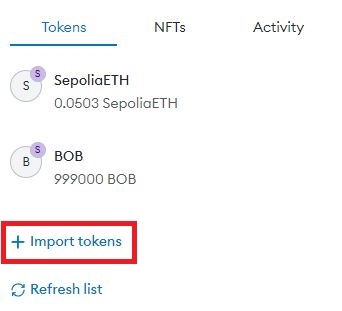
Step 4 - Check
As soon as the deployment process is completed, check your wallet with the corresponding blockchain explorer. In the related transaction, the new contract address can be found. Copy this address and use it while importing a new custom token into Metamask.
![]()

Congratulations, you have successfully created your first personal token.
Creating a token on a testnet is a great way to learn about blockchain technology and smart contracts without risking real funds. Remember, moving to the mainnet is a big step that requires thorough planning and, ideally, professional auditing of your smart contract.
Similar Articles
Unlocking the world of seamless crypto spending, crypto credit cards have emerged as the pivotal bridge between decentralized currencies and our daily transactions. Let's explore the leading players in this space and the native tokens that power them.
MyEtherWallet is a free open-source project. It provides the user with an interface for the Ethereum blockchain. Through this interface to the ETH Blockchain, it is possible to gain an insight into the transactions made there.
Decentralized finance (DeFi) and other blockchain-based applications are booming, but scaling challenges have made it difficult for many projects to achieve mass adoption. StarkNet offers a solution by providing a Layer 2 network that can handle massive transaction volumes while still preserving the security and composability of Ethereum.

Crypto Staking allows users to earn passive income and strengthen blockchain networks by locking their assets and participating in validation. Discover how staking can boost your earnings while contributing to the security of the crypto ecosystem.